
Interactive Image Mapper using RShiny
Hello Friends!! In this blog post, we will learn to Build an Interactive EXIF Image Mapper Using RShiny, Leaflet, and EXIFR.
If you’ve ever wanted to visually map your photos based on GPS metadata, this tutorial will walk you through building a powerful, interactive EXIF Image Mapper using RShiny, leaflet, and exifr. This app allows users to upload multiple .jpg images, extract EXIF data (like GPS coordinates and camera info), visualize them on a map, and download the metadata as a CSV file.
Whether you’re a data scientist, photographer, or hobbyist developer, this project is a great way to explore metadata extraction, geolocation, and web-based visualization all using the R ecosystem.
What Is EXIF Data?
EXIF (Exchangeable Image File Format) data refers to metadata embedded in image files. This can include:
- Camera model
- Date and time the photo was taken
- GPS latitude and longitude (if available)
- File size and format
By extracting and plotting GPS coordinates, we can create a visual timeline of where photos were taken ideal for travel logs, drone data, or field research.
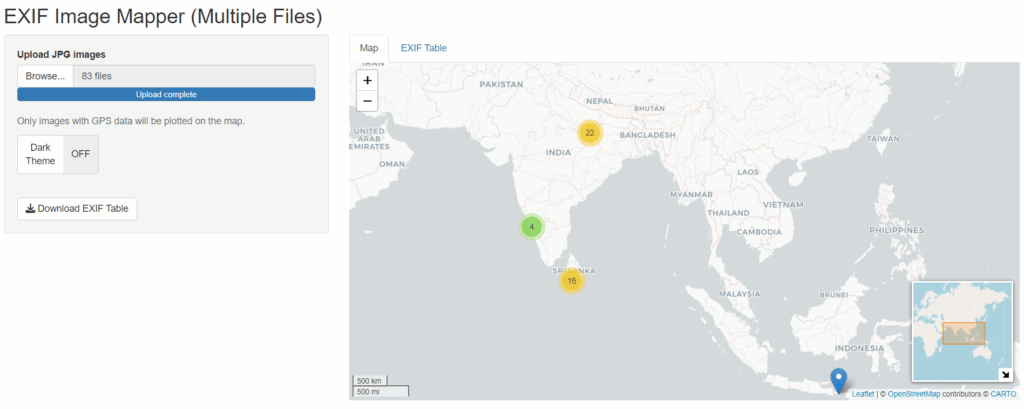
Key Features of the App
Here’s what the EXIF Image Mapper can do:
- Upload multiple JPG images at once
- Extract key EXIF fields: file name, size, camera model, date/time, GPS coordinates
- Plot images with GPS data on an interactive map using leaflet
- Preview image thumbnails in marker popups
- Cluster markers for overlapping locations
- Toggle between light and dark map themes
Download the EXIF data table as a CSV file
Required R Packages
You’ll need the following packages installed in R:
install.packages(c("shiny", "leaflet", "DT", "shinyWidgets"))
# exifr is available from CRAN
install.packages("exifr")
You also need to download and link to ExifTool by Phil Harvey, which is used by exifr for reading metadata.
How It Works
1. Upload and Extract Metadata
When users upload images, the app uses the read_exif() function from the exifr package to extract metadata from each file. It filters out only those with valid GPS data.
2. Show Metadata in a Table
The extracted data is displayed using DT::renderDT(), allowing sorting, filtering, and pagination.
3. Plot GPS Data on an Interactive Map
Using the leaflet library, the app plots GPS coordinates as markers. If the location data is missing, the app displays a message instead.
4. Show Image Thumbnails in Popups
Each marker popup includes not just EXIF details, but also a preview of the actual image (scaled to 150px width). This provides visual context directly on the map.
5. Dark Mode Toggle
The app allows users to switch between a light base map (CartoDB.Positron) and a dark theme (CartoDB.DarkMatter) using a simple toggle.
6. Export as CSV
All extracted metadata can be downloaded as a .csv file with a single click useful for documentation, reporting, or further analysis.
Sample Code Snippet
Here’s a quick preview of how markers are created with popups that include image thumbnails:
addMarkers(data = gps_data,
           lng = ~Longitude, lat = ~Latitude,
           popup = ~paste0(
             "<b>", `File Name`, "</b><br>",
             "Model: ", `Camera Model`, "<br>",
             "Size: ", Size, "<br>",
             "Date: ", `Date/Time`, "<br><br>",
             "<img src='", input$images$datapath[match(`File Name`, input$images$name)], "' width='150'/>"),
           clusterOptions = markerClusterOptions())
Why Use RShiny for This?
RShiny offers a low code yet powerful framework for building web applications. With packages like leaflet and DT, you can create interactive, data-driven applications that work directly in a web browser without requiring JavaScript.
Final Thoughts
This EXIF Image Mapper app is a robust tool for visualizing image metadata. It demonstrates how you can blend R’s statistical power with interactive front-end elements to build something truly useful.
Whether you’re building a photo mapping tool, a field data collector, or an educational app, this project lays a great foundation. You can easily extend it by:
- Adding filters (date, camera model)
- Uploading PDFs with metadata
- Integrating with cloud storage
If you’re interested in the complete code or need help deploying this app, feel free to connect or leave a comment below.
Keep visiting Analytics Tuts for more tutorials.
Thanks for reading! Comment your suggestions and queries.