
Create the calendar table with Power Query
Hello friends! Today we’ll be learning create calendar table with Power Query. Creating a calendar table using Power Query can be beneficial for several reasons like Data Consistency, Customization, Data Modeling etc. using M language to generate a range of dates.
Creating a calendar table using Power Query can be beneficial for several reasons:
- Data Consistency: A calendar table ensures consistency in date-related analyses by providing a consistent set of dates. It allows you to avoid missing or duplicate dates in your analysis.
- Facilitates Time Intelligence: For time-based analysis in tools like Power BI or Excel, having a calendar table simplifies calculations involving dates (such as year-to-date, month-over-month, etc.). It aids in implementing time intelligence functions and measures easily.
- Ease of Use: With a pre-defined calendar table, you don’t have to generate date sequences each time you need them in your analysis. It’s readily available for use across multiple reports or analyses.
- Customization: You can create calendar tables with additional columns like day of the week, week number, fiscal periods, etc., which can be handy for various types of reporting and analysis.
- Data Modeling: In tools like Power BI, a calendar table is often used as a Date table for creating relationships with other fact tables. This is essential for building relationships in a data model and performing accurate analyses across different data sets.
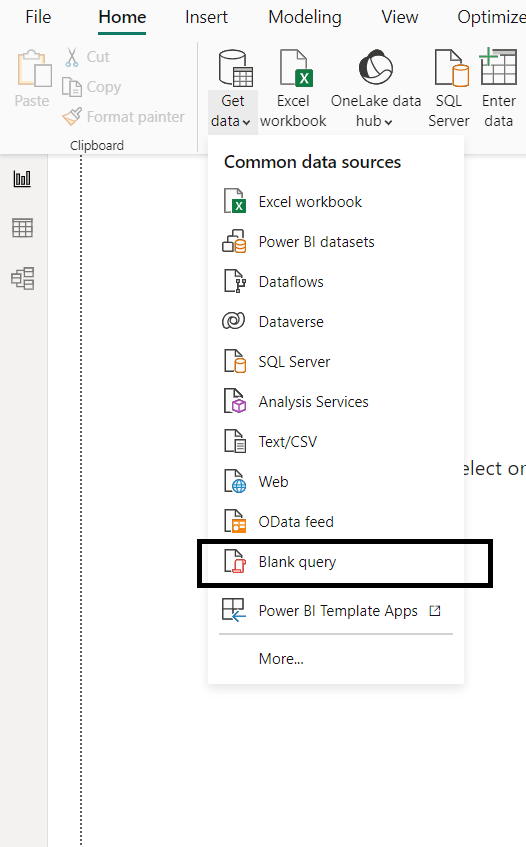
Go to get data and Blank query (as shown in image below):
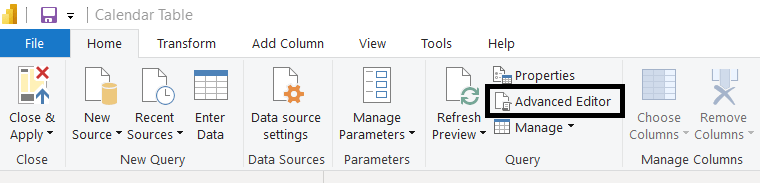
In the power query window, go to advance editor and paste the query below
let
Source = List.Dates(#date(2024,1,1),365, #duration(1,0,0,0)),
#"Converted to Table" = Table.FromList(Source, Splitter.SplitByNothing(), null, null, ExtraValues.Error),
#"Renamed Columns" = Table.RenameColumns(#"Converted to Table",{{"Column1", "Date"}}),
#"Changed Type" = Table.TransformColumnTypes(#"Renamed Columns",{{"Date", type date}}),
#"Inserted Year" = Table.AddColumn(#"Changed Type", "Year", each Date.Year([Date]), Int64.Type),
#"Inserted Month" = Table.AddColumn(#"Inserted Year", "Month", each Date.Month([Date]), Int64.Type),
#"Inserted Month Name" = Table.AddColumn(#"Inserted Month", "Month Name", each Date.MonthName([Date]), type text),
#"Inserted Day of Week" = Table.AddColumn(#"Inserted Month Name", "Day of Week", each Date.DayOfWeek([Date]), Int64.Type),
#"Inserted Day Name" = Table.AddColumn(#"Inserted Day of Week", "Day Name", each Date.DayOfWeekName([Date]), type text),
#"Added Conditional Column" = Table.AddColumn(#"Inserted Day Name", "Is Weekend?", each if [Day of Week] = 6 then "Yes" else if [Day of Week] = 0 then "Yes" else "No"),
#"Inserted Start of Month" = Table.AddColumn(#"Added Conditional Column", "Start of Month", each Date.StartOfMonth([Date]), type date),
#"Added Custom" = Table.AddColumn(#"Inserted Start of Month", "Year Month", each [Year] * 100 + [Month]),
#"Added Custom1" = Table.AddColumn(#"Added Custom", "Current Month", each let cm = Date.StartOfMonth(DateTime.LocalNow())
in Date.Year(cm) * 100 + Date.Month(cm)),
#"Added Conditional Column2" = Table.AddColumn(#"Added Custom1", "Fiscal Year", each if [Month] >= 7 then [Year] else [Year]-1),
#"Inserted End of Month" = Table.AddColumn(#"Added Conditional Column2", "End of Month", each Date.EndOfMonth([Start of Month]), type date)
in
#"Inserted End of Month"
Download the file here
Keep visiting Analytics Tuts for more tutorials.
Thanks for reading! Comment your suggestions and queries